The miter saw is one of the most useful tools of the many tools and equipment that can be found in a workshop or on a construction site. It allows for accurate crosscuts on different kinds of wood.
You can also read article to find out best miter saw blade in the market.
Table of Contents
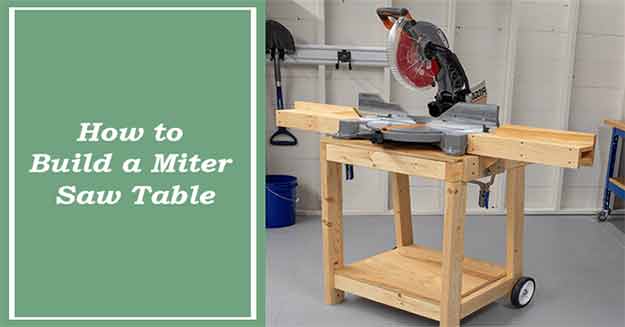
How To Build A Miter Saw Table
Other saws like the crosscut saw or even the hacksaw can also be used to achieve this purpose but the miter saw does it more accurately and with less effort.
The miter saw is considered an indispensable piece of equipment in shops that involve much woodwork.
Like other saws, using the miter saw needs support for a more convenient cutting experience. Miter saw tables or stations would afford the workman or carpenter proper support to be able to use it effectively.
Using it on the ground or other uneven experiences may lead to uneven and inaccurate cutting which would produce undesirable results.
Therefore, you need to have a good understanding on how to build a miter saw table before you start building one for yourself.
How Makes A Good Miter Table?
Before you learn how to build a miter saw table, it is important to know what all makes a good miter saw table.
Some Of The Important Things Are
- Similar to other tables or stations in the workplace, a miter saw table should be of proper height. Having it too high or too low will result in difficulties in its use, especially when it comes to projects which require accurate and precise cutting.
- It should be strong enough to support the weight of the saw, the wood, and the forces acting on it in the process of cutting. Otherwise, the station will eventually collapse, leading to accidents and possible injuries.
- Additionally, it should be just light enough to afford mobility in and around the workplace.
While there is readily available miter saw tables available for purchase, and buying one is definitely a good idea as you can be sure that these are good enough for mass production.
It is, also, a good idea to construct a miter saw table of your own. It can be down quite easily and the materials for it are also widely available. Plus, you can add a personal touch and customize it to fit your frame and your use.
If you do not know how to build a miter saw table, you can master it in with little research.
Materials Needed in Building a Miter Saw Table
Building your own table would require a day’s work and a bit of skill. With this set of instructions on hand, you can easily build a miter saw table!
The Materials That You Will Need Are The Following
- Plywood
- wood board
- wood studs
- Bolts and nuts
- Nails and screws
The Tools That You Have to Keep within an Arm’s Reach Are As Follows
- Saws
- Miter Saw
- Drill
- Measuring tools – squares and a tape measure
- Safety equipment – safety glasses and earplugs
Steps on How to Build a Miter Saw Table on your own
Step 1 – Draft a Plan!
The first thing we have to do is draft a plan on how our table will look like. You can reliably look for plans online, or you can even consult a more experienced friend for this.
Perhaps you can even draft a plan from scratch! Remember to follow your plan religiously in constructing your own miter saw table.
Step 2 – Measure The Wood!
Perhaps the most important step of them all, we start our table by taking the necessary measurements. For this particular step, we need to take the necessary dimensions, the width, and length, of the miter saw. This is so that that the platform of the saw table would match that of the saw.
We also need to take note of the depth of the saw so that it can be firmly set on the table. Most importantly, we need to measure the height of the table. This would require measuring the distance from the floor to the surface of the miter saw which you plan on working on. Feel free to adjust based on your own height as you need this measure for a more convenient use of the miter saw.
Step 3 – Cut the pieces of wood
Once all the necessary measurements are taken, what follows would be cutting our wood to match these measurements. Use your saws to cut the pieces of wood for your miter saw table. Remember to provide allowances when cutting and to take account of spaces which will be used once all these pieces have been joined together.
Step 4 – Divided the Materials!
This step does not really involve division but is rather for the dividers that will be used as a support for the table.
As with the table surface, the dividers would necessarily have to be measured against the planned height of the table and cut equally into as many supports or legs that you plan your table to have. Often 4 or 6 is a good number. Be sure that the wood that you will use is durable enough!
Step 5 – Assemble the Materials!
Now that you have all the necessary parts cut out and measured, the next step would be putting them all together! Following your plan, carefully join these pieces of wood in their proper places.
Note when to use nails, and when to use bolts in piecing your table together. Make sure that you have safety gear equipped when handling drills, and hammer and nails.
Step 6- Design Saw Table!
Your table is almost ready! Once it is already up and standing, don’t forget to run sandpaper against it to smoothen out rough surfaces. You can even apply paint and varnish to give it a more formal or customized feel!
After all these steps have been finished, you now have your very own (personalized) miter saw table ready for service!
Helpful tips and tricks on how to build a miter saw table
In building your miter saw table, keep these tips in mind for a smoother construction experience!
Always Keep Your Plan In Hand
You can have a copy of your plan printed out or save it on a mobile device for easy reference. As we cannot always remember the exact plans and procedures always, this will give us an easy way to look back and check if what we are doing is going according to plan!
Wear Safety Gear
In undertaking this project, always be in protective gear especially when it comes to handling equipment like saws and drills. While accidents are unlikely for as long as these are handled properly, it is always better to be on the safe side of things and be ready in cases of accidents.
This way, injuries are minimized and even avoided. Ear plugs are also helpful when it comes to using loud equipment such as drills to avoid damage to the ears.
Always Double Check
Be it in terms of measuring, cutting, or assembling, always remember to double check first. This is more important when it comes to cutting and assembling as once you start, there is no turning back.
Ensuring that what you are doing is as planned leads to a perfect make and it also avoids wastage both in terms of materials and effort.
Don’t Hesitate To Ask For Help
If you are not clear of any step on how to build a miter saw table, or when you encounter something that you are unsure of, or run into a difficult step that can be hard to pull off, or would just need help in using a certain piece of equipment or doing a particular step, don’t be shy and ask for help.
Doing so would steer your project to the proper direction and it would avoid disastrous results which might be the result if you chose to proceed on your own.
Use Quality Equipment And Materials
Sometimes, having these is half the job done. Quality equipment and materials are already half of the quality work.
This also translates to a more durable project and one which has a longer lifespan – as opposed to one created from substandard quality which may even cause accidents whether it be during construction, or even worse, when already in use.
You Just Learnt How to Build a Miter Saw Table
Constructing your own miter saw table can be an arduous task. There will surely be difficulties that you will encounter in undertaking this project. It may be hard to start, especially if you are building from scratch and with little to no experience.
There may be hiccups that can be encountered along the way which may cause delays. But like all things that we work hard for – it always a good feeling to see your project coming into fruition piece by piece.
And once the whole thing is already standing, you can have what you can perfectly say is your very own achievement!
So don’t be discouraged. You know now hot to build a miter saw table. Go ahead and start planning on how to build your very own miter saw table! Who knows, others might even commission you for their miter saw table needs!
Do not forget to share this with your friends and post your valuable comments here.